Felt Dahlia Curtain Tie Backs

Sorry for the disappearance. Long story short the month of April was crazy!! My parents have been visiting, my phone was broken for 7 days or more, and now I have it back!! I was also on a crafting hiatus in order to spend time with my family. We had a collective garage sale mid-May that I would say had a good turnout. Other than that, babies are doing well and I am back onto blogging.

My current project is inspired by these curtain tie backs found on the etsy shop BedBuggs. It began with getting help from my step dad to hang curtain rods in my bedroom to separate the master bedroom from the extra room space. I’ve been wanting to do this for a long time and I’m elated that we got to hang it. My curtains were purchased through one of my Facebook community swap meets for an amazing $10 for four panels of sheer lavender (still pretty opaque though). Amazing! Then once those were hung up, I bought the felt and started playing with the concept. Here is my tutorial on making the Dahlia Curtain Tie backs…

Supplies:
– Felt (color of your choice) 10 sheets of 8×11 to make one full flower
– Scissors, Hot glue gun

1. Start with the size of the circle base. I used a 6 inch circle cut from some scrap felt. It was a rough cut, but you could also use a plate to help draw the circle better.

6 Inch Circle Base

6 Inch Circle Base

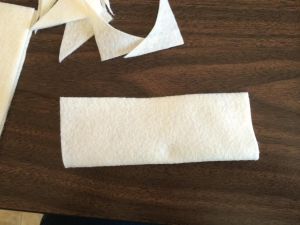
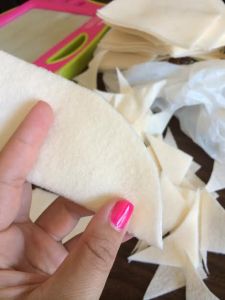
2. Then start cutting the 8×11 sheets of felt into 4 pieces. Cut in half one way and then cut the two pieces in half again. So you should get 4 rectangles from the one piece. About 40 pieces total. I then folded the little rectangle in half the long way. Cut the shape of a leaf so that it is pointy at one end and rounded at the other.

Cut into 4 rectangles

Cut into 4 rectangles

Fold long way in half

Fold long way in half

Point on one end, round on the other to make leaf shape

Point on one end, round on the other to make leaf shape

curtain2

curtain12

Leaf shape

Leaf shape

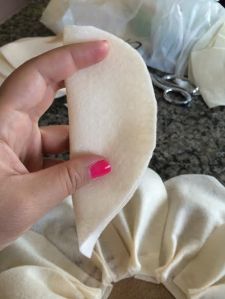
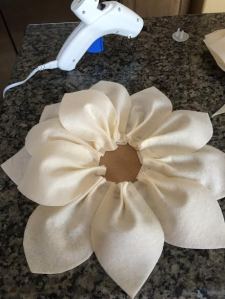
3. After cutting out all your leaf shapes, heat up your glue gun and play with the leaf shape. Pinch two hills to make it scrunched up and hot glue both sides. I made 4-5 leaves and then started to hot glue them to the circle base. Once I got the first layer, I made another set of 4-5 pieces and then glued those on as well. On my first attempt, the second layer had the leave facing up (imagine cupping your hand so you could see the inside of your hand). This turned out great, but I wanted to try it both ways. I honestly like them both facing up and facing down, so I will make one of each!

Pinch into this shape, hot glue in between each hill

Pinch into this shape, hot glue in between each hill

This is what it looks like flipped

This is what it looks like flipped

Start layering. First layer overlapping a little. Second layer goes over first

Start layering. First layer overlapping a little. Second layer goes over first

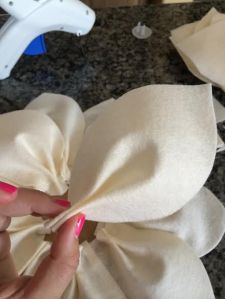
4. The third layer needs to be glued in a standing up position. See from picture that it should create a moon shape. Do the same for the inside bud (fourth layer) and I would even cut the leaf shape smaller to fit snug inside.


Notice the inner buds are standing taller

Notice the inner buds are standing taller

My version of Dahlia Curtain Tie Backs

My version of Dahlia Curtain Tie Backs

5. Thats it! I let the flower dry 24 hours, then cut another 6 inch circle out of thin cardboard (reuse cereal boxes) and sandwiched a length of tulle between the felt and cardboard. This is dry also for at least a half day and then tied onto curtains. These have been tied ontoย my curtains for three days and so far so good!


Good luck with your Dahlia! I’m starting to love this flower ๐Ÿ™‚

Sherie Signature

Teddy (Bear) Claiming Prime Spots

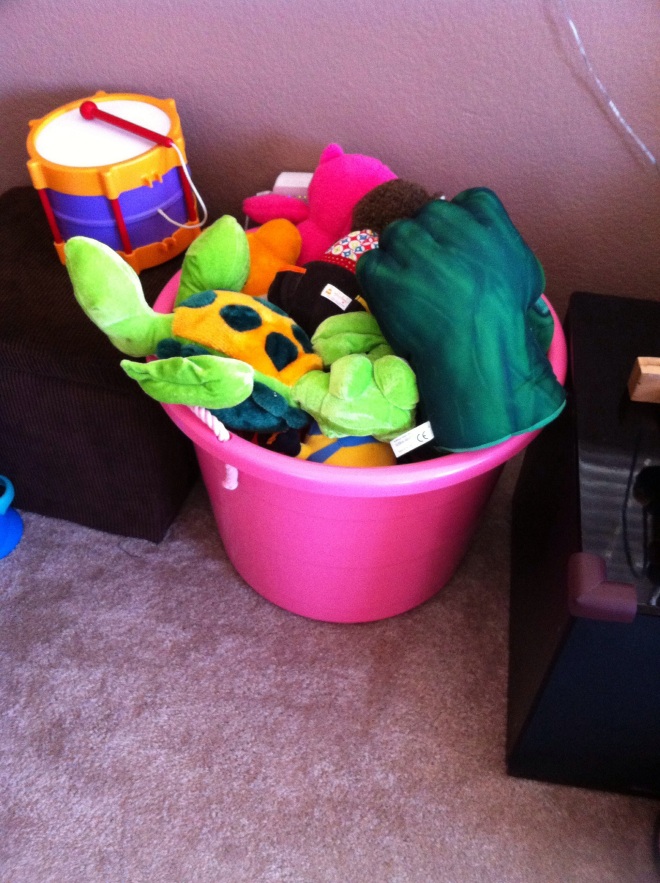
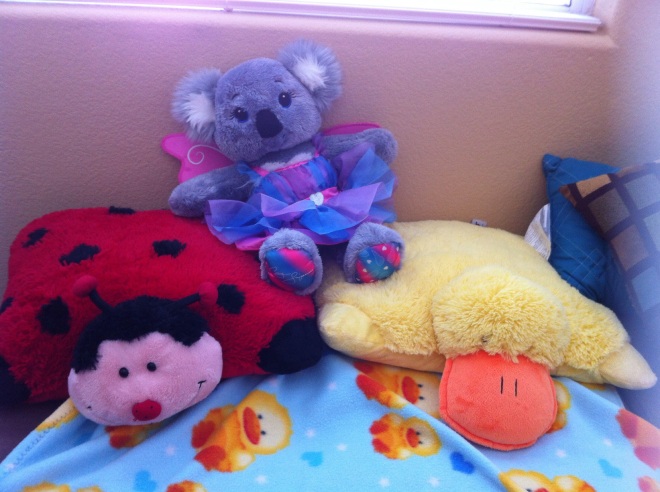
What does it say about an adult who has a hard time letting go of your child’s precious stuffed toys? I don’t remember having to do that growing up because I didn’t really have any attachments to my animals. I had favorites yes, but then my mom would grab the toys we never played with anymore and send them to the Philippines where our cousins were more in need of them. Of course, how could I be selfish? It would be cruel of me not to share. Yet, with my toddlers, I feel more of a sentimental attachment because it’s the Pooh Bear I never got as a kid, or my husbands hulk hands that were given to him as a joke, but I love them. The start of a collection of dolls that I can totally see getting out of hand.

20140424-001554.jpg

20140424-001605.jpg

20140424-001620.jpg


So where do I go from here with this collection? My hope is that I will slowly get rid of things that either get dirty, ย my child loses interest, or I have multiples of the same type. For example, in the bin of stuffies you can see that I have multiple turtles. This is my personal collection that I started with my then boyfriend (now husband). I just love turtles! I want to swim beside them and visit them in their element. I don’t want to have a pet turtle, mind you. I don’t like pets because I personally didn’t grow up with pets and I have no need for them. But turtles I will visit and it would be great. In the mean time, I have my collection… but I could probably get rid of them. I don’t need ALL of them.

This organization post is starting to look like it needs an intervention, lol. Hello, my name is Sherie and I love turtles! I have a problem. :/ ANYWAY, the simple thing to do is to group like items. All dogs, bears, dolls, turtles, and other categories and only choose one of each group. The hard part is that you usually play with more than one doll as a child… So set a limit like 4 dolls = a tea party. Two dogs = guard dogs during fight play, and so on…

Good luck with your own personal stuffed animal collection and purge. Mine will probably not happen for a while.


All my best,

Sherie Signature

Spending Quality Time

Whidbey Island Deception Pass

Whidbey Island Deception Pass

I’ve wondered on occasion if I use my time wisely throughout the day in matters of cleaning, cooking, crafts, taking care of child(ren), my spouse, friendships, etc… The list goes on and on. Yes I would hope that I do manage my time well but I’ll let you be the judge of that. Here is my typical day in bullet points:

  • Wake up to my husband getting my daughter, hear them playing, changing diaper, and coming into our room. At this point I still almost always have my eyes closed until she is sitting in bed with me and we say “Morning” to each other.
  • Then as I slowly peel my eyes open, put on my glasses, and get out of bed I begin my day. Usually I head to the toilet first, deposit any change (aka #1 or #2), followed by brushing my teeth. At this point my daughter has noticed this, puts down my cell phone (my husband usually gives her the phone first thing as a distraction… not what I’d like to do, but I’m not the one waking up to get her) and comes to get her toothbrush too. We brush our teeth, I make the bed, and get dressed and then I usually grab some clothes for her on the way down the stairs.
  • Breakfast is always so hard for me. I’m not a cook at all. I get inspired here and there, but it does not come naturally to me. I love to eat, not to cook. So its either cereal, eggs, or bread with fruit. I feel really badly for my baby. I’m not really into reading about every health story and whats best. I’m lazy when it comes to that. Sorry, its the truth. I’m all about convenience. But I do try, trust me. Fruit is my go to healthy food.
  • When she is all done “al don”, I take her out of the high chair, kiss, put her down and she has been so trained by now that she will bring me the PS remote if I’m too slow to put on her “show”. Frozen has been played every day since we came back from Washington (unfortunately for my stepdad). So I’ve been asking her what she wants to watch. I start naming off shows like “Super Why”, “Croods”, “Caillou”, “Tinkerbell”, etc… and she will say “uh uh” which means no. Once I find one she likes she says some jibber-jabber and I start the show
  • I clean up dishes while the show is playing and then go to my To Do list that I’ve prepped the night before. Depending on the day I have certain tasks I’ve assigned to days of the week. Monday – start laundry, Tuesday – Toilets, Wednesday – more laundry, Thursday – Craft day, Friday, Saturday, and Sunday – depend on if I’m cleaning up a certain room and I will try to focus on that.
  • After I have started my To do list, I then sit down at my kitchen work area where my computer is, open the tab to Facebook and get sucked into the abyss. Facebook has been horrible and its my own fault. I am part of garage sale groups so I am constantly searching for great deals or posting my own things to sell. This takes up most of my morning. My daughter will come over to me once in a while to get my attention. I want to say that I do give her my attention too. She will climb up on the chair next to me and I will hand her a pad of paper and pen. She will sit with me scribbling for a good 5-7 minutes, then move on.
  • I do play with her. We play chase, tickling, and going through her ABC. Unfortunately she has not wanted me or my husband to read to her before bed time for the past month. She wants to read the book herself. I haven’t done too much research into whether this is normal or not. But I figure she still is grabbing books all the time, so they must interest her. She just wants to be independent.
  • Lunch time starts between 11 – 12 depending on the day. Its either nuggets, hot dog, mac n cheese, or something left over from dinner the night before. She is pretty independent when it comes to feeding herself. And I’ve learned to let her be messy. She actually doesn’t like it when she gets messy now because of me. If she has sticky fingers she’ll whine until I wipe them clean.
  • Naptime is 1-3, which means quiet time for me. I reset the toys, do any dishes, and work on my to do list. My To do list consists of projects I’m working on like birthday gifts I may have to sew, little home decor projects, or de-cluttering zones in my home. I really look forward to the 2 hours of quiet time too because I don’t have little fingers getting into everything. Sad, but true.
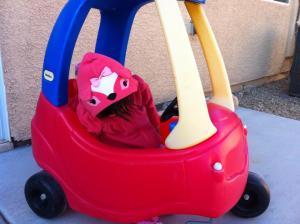
  • After naps, snack time and playing outside in the backyard with bubbles or ball or the cozy coupe cars. I haven’t been taking her to the park lately because of windy weather, but when I can we’ll go to the park and let her slide, swing, or walk around.
  • Then its dinner time, bath, and bedtime routine.
Fox in Cozy Coupe Ride

Fox in Cozy Coupe Ride

The day goes by so quickly some times that I feel like I haven’t really had any quality time with her. I wonder what would happen if I just disconnect from Facebook for a week and spent real quality time with her. I honestly think I would be ok. I would have to do more play time with her and schedule learning time. I have tried to do that in the past but have always gotten off schedule. What if my day went more like this:

  • Wake up, Breakfast, Dishes, Start To Do list cleaning
  • Reading time with toddler
  • Activity to associate with book
  • Lunch
  • Play time – puzzles or play house
  • Nap
  • Snack
  • Play time outside with bubbles or ball
  • Dinner
  • Reading time
  • Bath and Night Night
Snack time and Play

Snack time and Play

See, it looks so easy on paper. But then I check my darn email (54 emails to check, I MUST LOOK), get stuck on Facebook, and I put on another show for her. I’m being realistic here. My life is not how I wish it could be, but its also not terrible. My daughter loves to play chase with me or get tickled. She’ll sit in my lap while we watch her show and we’ll sing “go” together (frozen movie). I guess I’m trying to validate my current schedule. ย But what’s wrong with it being not so perfect?! Its mundane but it has routine which is good for her and when I do go off schedule is when she gets cranky.

So in conclusion, quality time is based on my daughters needs and mine. I’ll keep tweaking the schedule and trying new things. But overall, she is happy, so I am happy. We enjoy our time together and that’s the quality that I’ll try to achieve.

Bouncy House Play

Bouncy House Play


Sherie Signature

Decluttering Disturbs my Sleep

Right before my head hits my pillow and after I’ve put my phone down to sleep it suddenly hits me! I have to get back out of bed and declutter something. This burst of energy increases as I start to think of what else needs to be done around my home. Has this de-cluttering sleep monster ever bothered you? I’ve been yawning all throughout the day, drank two cups of coffee, but somehow this stored up energy comes from within me.

I started by thinking I could unpack my suitcase that has been sitting at the end of our bed for the past 5 days since we came back from WA. ย Eh, nah! That is too much work at 11pm for me. ย I got out of bed, turned the light on and looked around the room. There was aย random sock of my daughters onย the floor, more laundry folded in a basket begging to be put away, and then I saw a candle burner I haven’tย used in years! I thought, “I could sell that on my FB online swap meet group for like $10, right?! Done!” And then I was on a roll… Taking pictures, wiping down surfaces, grouping things, making a sell pile, bring to new location pile, and trash pile. I cleaned off my husbands dresser surface which in the last month has become a dumping zone for toys, books, new boxers, projects, etc… Hot mess? Heck ya! Then I also tackled my dresser top, sold a bundle of candles & accessories, and removed seasonal items to be put away later.

Now that I’ve finished cleaning, clearing, selling, and putting away I felt satisfied! The clutter bed bug has been scratched until the next night I get attacked at 11pm (took me 3 hours to do all this).

I recommend doing things in smaller portions or time restrictions usually, but I think it’s OK sometimes to go with the flow. As long as I don’t start to feel upset or tired by doing it, then it’s all good. I was actually super motivated to post things for sale and get them uploaded ASAP!! (Money, money, money – Andy voice from Toy Story)

G’nite and sweet dreams

Sherie Signature

20140419-012305.jpg


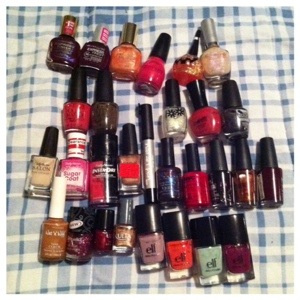
Nail polish that I sorted through that I know I have too many of the same color or won’t/haven’t ever used.


20140419-012314.jpg


Teething Bling Bangle was used when my daughter was 6 months to 12 months. But it didn’t work well for me, because I still had to remove the bangle and just hand it to her.

20140419-012323.jpg


This is nail accessories like flowers, beads, etc… that I used for my wedding nails and have not touched since (2 years plus)


Easy Easter Bunny Basket

So after our busy week and first flight to Washington, I decided to take LB toย an Easter egg hunt the very next day. As tired as I was and as little that I wanted to do once we got home, I still wanted her to have fun and enjoy the celebration. I’m really happy that I did take her because coming from cold weather back to warmth was really good for her. She had the sniffles since we left so for her to enjoy the outdoors was nice.

20140413-225556.jpg

Her favorite part when we were egg hunting was wandering away from the group to explore on her own. I showed her what to do with the eggs, but it really didn’t mean anything to her yet.

20140413-230258.jpg

Still, it was a blast and we only had to bring a basket. I was first inspired by this basket (link here) and I had bought all the materials but didn’t make it in time. Instead I reused a summer pail that we got from a party last year, some foam stickers, and a marker for the face. Then I took white construction paper and a patterned paper and made bunny ears. Taped down with patterned duck tape. I made it in 10 minutes while watching Shark Tank with my hubby right before the party.

20140413-225919.jpg

20140413-225950.jpg

I think for last minute it turned out cute and now I can exchange the dollar tree one I bought for something else!!

20140413-230100.jpg

Love my little bunny!

Sherie Signature

Airplane Sorry Bags & WA Trip

Airplane Sorry Bags & WA Trip

We just returned from a 5 night, 6 day trip to visit my brother and his family in Washington. We had a mini family reunion too, just immediate family. It was exhausting and it was also a lot of firsts for us.ย It was our first flight with our 2 year old, which if we had gone a week early we would have saved $300+ on flying, etc… Our first time to take a shuttle onto a ferry! Super fun, but I wish we could have taken her around the boat. Too scared though that she would jump overboard. Lol

The one thing I was really excited to make for the trip was the Airplane Sorry bags found here (link). I estimated that if you make about 30 bags total (15 for each way, to and from your destination), it costs about $0.50 per bag with the goodies I put in.ย I will come back to this at the end of my trip story, or you can scroll to near the end.

So again it was our first trip and although I’m really a big planner, I hate doing research for things! Funny right?! I just hate having to scourge through all the muck of information. I got a general consensus from our normal go to mommies and then also based our needs on my daughter’s personality.

Our trip to WA was horrific (it really felt that way and go ahead, nod your head if you remember that feeling). Let’s just say that it was poor timing on my part as far as turning on the movie, giving her sippy drinks, and since it was a first experience for her, poor thing had a hard time.
On the return trip things went much more smoothly. She still had smaller meltdowns, but since I dealt with them ALL, I say they were much easier coming home. She had her juice cup, Frozen (the movie) was playing on her device and she was happy. She already took her nap in the shuttle and I was surprised that she wasn’t as cranky. Probably because the TO flight was right at nap time. My bad :/. I’m am not gonna be that person that reads every horrible story on the internet and freaks out. I figure I get criticism and scolded when I do research and when I don’t. I just have to learn to shut out the negative and let in the positive.

I’m positive that my husband never wants to go through that again (we’ve been banned from attending a wedding in May for fear of embarrassment). I’m positive that as she gets older it will slowly become easier in ways and other things will be difficult.
I’m positive that I will have the memories from our first flight and the ringing from my ears will eventually subside.
I’m positive that although this was a trying week, my baby girl is the sweetest girl and is my perfect little one. Just like your child fits you.

Happy Child

Happy Child

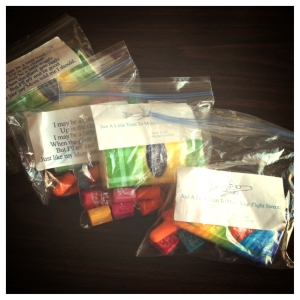
Back to the Airplane Sorry Bags. So cost is $0.50 for 30 bags total or $15 total estimated.
Included:
Sandwich Baggie with labels – I owned both baggies and labels
Starbursts 6 pieces per bag = $5 (estimated)
Tissue pack (8 pack at dollar tree) = $4
Earplugs (5pk at dollar tree) = $6

Sorry Bags

Sorry Bags

Total $15 and so worth it. Both my husband and I were late on delivering the first set of bags, so we saved them for the return flight. All the comments I heard were “this is new”, “oh cool, earplugs … I may need it for that kid” (another kid 3 rows behind us had a really hard time). The best part was that they ate the candy and I didn’t feel like I was getting dirty looks the whole time like with the first flight.

Now I know more for our maybe next trip to Disneyland. We’ll see how that turns out.

Happy Sunday Recap!

Sherie Signature

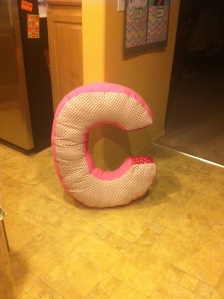
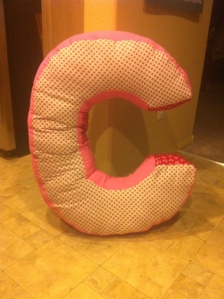
ABC XL Pillow

These last few weeks I’ve slowly been losing momentum (gas power) with all the projects I have been juggling. I spent Tuesday night re organizing all my projects into manageable containers. Although I didn’t take a before picture of my sewing/guest room, just imagine it looks like your craft space when you have 10 + projects going on!

Never-ending Organized Projects

Never-ending Organized Projects

I did want to share a tutorial on this awesome XL Alphabet Pillow. My inspiration came from here but if I were to buy it it would come from overseas and this site didn’t ship to US! I’m the girl that always tries to get a bargain and this just isn’t one. I really wanted to make one for my niece who turned two in late February. I had most of the fabric already which was nice. The hardest part was the pattern.

Newspaper (butcher paper), scissors, pencil, rulers

Newspaper (butcher paper), scissors, pencil, rulers

Supplies –
– Newspaper or butcher paper, I had this heavy butcher paper on hand from my mom. She left it with me and I love it. The only thing is that because its so heavy it kept rolling up on itself. Ironing ย the paper helped with that.
– Pencil, I used a pen because I’m stubborn like that. I remember in high school I was taking a math test or something and using a pen. The teacher asked me if I wanted to use a pencil instead and I said “no, I’m good” I just prefer pens. I did learn my lesson with this project and I highly recommend using a pencil.
– Scissors
– Rulers: I have a straight 24 inch quilting ruler bought from Joann’s and the other curved arm ruler is from my mom.
– Bowl (large or medium)

Making a Pattern:
Luckily the letter I started with was simple “C” and didn’t discourage me too much from continuing. I decided to make the pillow 7.5 wide (with 1/4 seam allowance would bring it down to 7 inch wide). I had started with 5 inches, but it looked too narrow and I wanted a wider pillow. I tried to keep the height at 24, but some of the other patterns needed more length. ย I started by marking width of the C, drew out the curves using the bowl and arm ruler for the inner C. The outer C I measured 7.5 along the inner C and made tick marks. Then I connected the lines and it came out great! Sorry I don’t have a step by step picture for this part.

Other patterns I also worked on

Other patterns I also worked on

Unfortunately I didn’t take a picture of the “C” pattern, but as you can see from the above letter patterns, it looks humongous. my other patterns have a 7 inch wide margin, keeping in mind I would use 1/2 inch seam allowance and bring it to 6 inch wide.

Fabric goodies

Fabric goodies

Joann’s had a great deal for about two weeks or longer on all their snuggle flannel. So I stocked up and look at all these yummy fabrics!

Make sure to iron fabric

Make sure to iron fabric

Trace pattern

Trace pattern

I traced the pattern onto a main fabric and then cut out 7 inch wide strips in another coordinating fabric. I also added a secret pocket in a cute fabric as well.

End caps

End caps

Pin sides and sew

Pin sides and sew


You can start by sewing your strips together. Then take the main fabric and pin to the strips going with the curve.

Cpillow4 Cpillow6 Cpillow7 Cpillow8

Here is a quick look at what I did. You have to make the fabric work with you on the curves but again the “C” was a really good letter to start with for me.

Cpillow9 Cpillow5

Leave an opening at one end cap and flip the fabric inside out. I did make a mistake with this initial pillow because the strips where sewn backwards and exposed the fray.

The fray shows

The fray shows

Either way, it works. Remember to sew the pocket on the strip too before closing up the pillow.

Cpillow11 Cpillow12 Cpillow13 Cpillow14 Cpillow15

Stuff pillow – this took me 4lbs of fiberfill. Good thing I used coupons at Joann’s. Stuff it really full too. I think I could have used more. I hand stitched the opening shut.

The only mistake I made really was using a 1/4 seam allowance. I found out later that I should have used a 1/2. Oh well! Hope you get inspired to do this as well and if you have a crafty sewing friend like me to help you with the patterns (thank you K), take advantage because some of the other letters are hard! I still have to make about 7 other alphabet Pillows, Yikes1


Happy Friday!

Sherie Signature


Where’s Sherie?

drummer

These past two weeks have been filled with sick (grainy poop, vomit, and yucky-ness) for our toddler. She caught a virus that’s been going around. She is slowly getting better, meanwhile I’ve been busily trying to get details for her 2nd birthday party completed like her fairy skirt (link), birthday felt crown (link), fairy decor details (link), and food preparation.

Spring is a very busy season for us because along with it being her birthday soon, many of her cousins have birthdays as well. So I’ve been working on various handmade presents that I hope to post soon. Since I’m pretty sure my friends and family don’t visit here often, I’ll share what I’m working on.
Projects/gifts for birthdays:
– Hopscotch game (link)
– XL letter pillows (tutorial will be coming soon hopefully)

Cpillow15
– felt crowns (see link above)
– bean bags ABC

BB zigzag

I swear it felt like I had more but I guess it’s also because it’s times 5. But I’m really excited about finishing each project.

On top of my laundry list of projects to do, I’m also trying to prepare for our flight or trip to Seattle for a mini family reunion! It’s Reina’s first flight and I’m totally nervous. All the other pro flying moms have been through the yelling, screaming before, but I’m trying to prepare as best I can. I do know and accept whatever happens, will happen. I don’t know why but every time I tell someone that I’m planning ahead for things, I get crazy “why would you do that?!” looks, like it’s stupid to be prepared. Whatever! I had a bad week too because some 70 plus year old granny called me stupid at Joann’s because I had to pass through her aisle and she had to move her cart. I really hope I don’t become cranky old.

Okay, that’s where I am this week. The next three weeks will probably be posts like this until things calm down. But have a great weekend!!

Sherie Signature

Ring Pincushion Tutorial

Back in high school (1997-1998), I took a Home Economics class and learned so much from my teacher. Unfortunately, I can’t remember her name but she was a fiery red headed woman with lots of talent and was very helpful in teaching us the certain skills we needed. One of the lessons I learned from her and I still do to this day, is every time you pass through a door, suck in your tummy muscles. Eventually you do it so much that it becomes natural and you look taller, skinnier, and beautiful. Lol, I don’t know if that was true every time, but I could definitely feel the difference when I got pregnant and I had to force myself to push my tummy out. Its a great habit to start!

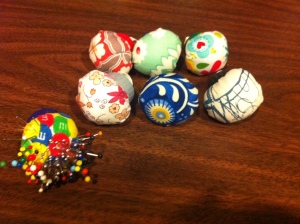
Anyway, she also taught us a lot of sewing and one of the projects was this Ring Pincushion. I still have mine from many years back and I love it! So for Valentines Day, I wanted to make this for all my mommy friends because it was both beautiful and functional.

Original is the M&M pattern

Original is the M&M pattern

I searched Pinterest and YouTube for a tutorial to make this and I found some that were a wrist pincushion, some made out of felt, and others. It didn’t suit my need though to make this, so I wanted to share with you this tutorial. It’s probably in a craft book somewhere, but here is how I did it.

Supplies:
– soda bottle cap
– 4 inch circle of fabric of your choice
– needle and embroidery thread
– thin elastic
– hot glue, drill and drill bit, scissors
– stuffing or cotton balls

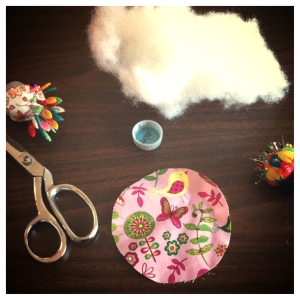
Supplies

Supplies

1. Cut out your fabric into a 3.5 to 4 inch circle. I started with a 5×5 square and cut from there.

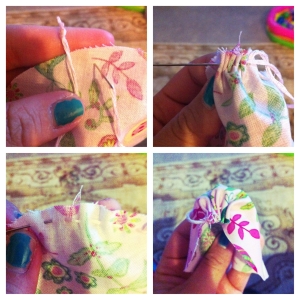
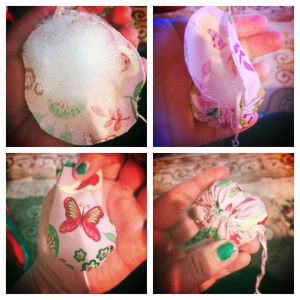
2. Use a gathering stitch on the circle with your needle and thread (make sure the knot is inside). As you start to pull the circle tightly, add a little bit of stuffing at a time until you’ve finished the circle gather and stuffed it full. Make sure to knot well and close off.

4 inch circle cut from 5x5 square.

4 inch circle cut from 5×5 square.

Use gathering stitch

Use gathering stitch. Notice it becomes a Darth Vader cap ๐Ÿ™‚

Use gathering stitch and fill in your puff.

Fill in your puff.

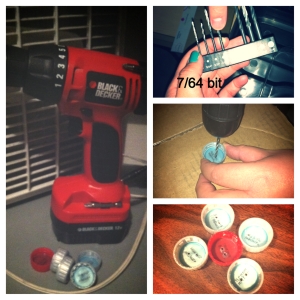
3. ย Then have your husband or if you are handy, drill two holes into the soda bottle cap.

Drilling holes, I used a 7/64 bit

Drilling holes, I used a 7/64 bit

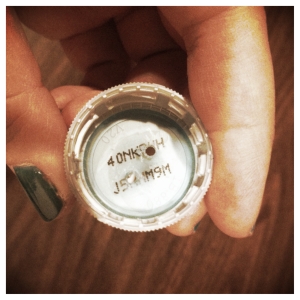
Make sure the holes are close to the center

Make sure the holes are close to the center

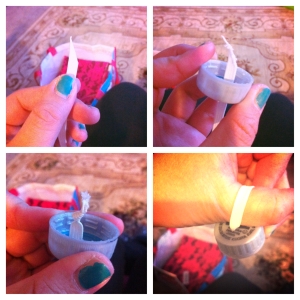
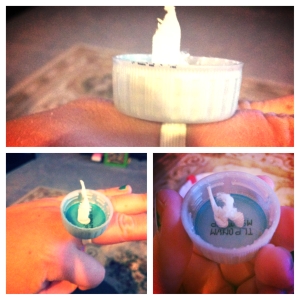
4. Take one end of the elastic, cut it at a sharp angle to create a point. Feed it through one of the holes in the bottle cap. You may have to use your scissors to widen the hole and feed it through. Once you have one side in, make a knot and pull tight. Then test the length to fit your fingers. I start with my thumb and middle finger because those are the ones I like to put them on. Cut the elastic with some extra length. Feed the other end in the hole, make a knot again.

Feed elastic into bottle cap holes.

Feed elastic into bottle cap holes.

Knotted. Elastic ring.

Knotted. Elastic ring.

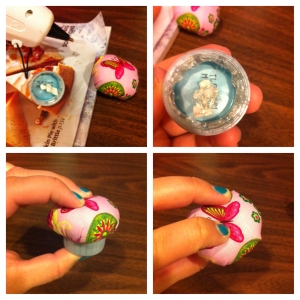
5. Add hot glue to the inside rim of the bottle cap and the bottom as well. Apply the puff you made in step 2, press and hold for 30 seconds or until glue dries.

Add hot glue to inside rim.

Add hot glue to inside rim.

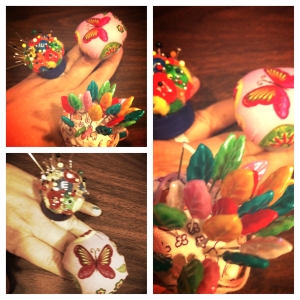
6. Add pins and start fashioning your Ring Pincushion. Make one or a dozen, they are great gifts too!

Completed Ring Pincushion!

Completed Ring Pincushion!

Hope you have fun trying this tutorial. Please share the ones you make with us here too!

All my best,

Sherie Signature

ABC Playmat Games

20140307-154247.jpg

ABC play mats are so much fun in our house at the moment. Our LB is fascinated with letters especially from watching Super Why (a lot). As of now the main game we play is “What Letter is This?” Which she gets about 70% of them right and the ones she doesn’t know she calls them all “double-you”!!

I do try to incorporate colors because of how colorful they are, but she is still interested in letters mostly.

This is her game that she plays and I love that she does it. Kids CAN learn to clean up at a young age! After we lay out all the letters, she gets to take them apart and put them in their bin. As she does this she says the letter out loud. I swear I didn’t force her to do this. But she sees me on a daily basis putting things back and after all, once it’s put back it can be dumped out again. That’s the best part ๐Ÿ™‚

Some other games that we are trying and will try in the future is:
– Jump on a letter when it’s called out
– Simple spelling words
– Sounding out letters

I’m sure there are plenty more, but this is our Play for the week. Also I won’t keep this out all week. First reason is because I would have to search for all the pieces at the end of the night and I just don’t want to. Second, if she only gets to play with it a few days in the week, I feel like it holds her interest longer. A lot of moms do the toy rotation and I like it too. My mindset is the toys that have a million pieces should only come out a 2-3 times a week.

Have a happy Wednesday and Play!